

How to Create a Realistic Looking Dirt Layer using Maya Transfer Maps
When attempting to add realistic looking dirt and grime to your 3d art, it can sometimes be a little too easy to go overboard. In this tutorial you will learn a simple technique of adding dust and dirt to your 3d objects, without overdoing it, to finally give them a more lifelike and realistic feel. The software we will be using is Maya, but this technique can be used on almost any 3d model, and can easily be acieved in all of the major 3d packages on the market.
Final Effect Preview

Step 1
Open your model of choice (I will be using a couch I made earlier). Make sure it’s uvs are already laid out, and is at the center of your scene (0,0,0).

Step 2
Next, let’s create the light. In Maya we will use a point light, but if you’re following along in 3ds max, you can use the Omni light.

Step 3
The light is automatically created in the middle of the scene (at 0,0,0). Make sure your light is lined up with the center of your model, as you will want the model to have even light on all sides from the top down…

Step 4
Move the light up a bit. The distance shown in the image below should be good.

Step 5
Next, make the light colour red. This is important for when we bring it in to Photoshop later.

Step 6
Now go to the upper left corner in Maya, click the drop down, and choose “Rendering”

Step 7
Then, under “Light/Shading”, click on “Transfer Maps”. I use this a lot, so for convenience I added a transfer maps button to the shelf. You can do this by hitting ‘Alt’ and ‘Del’ on your keyboard while you have a tool highlighted.

Step 8
Select your model and clone it, but don’t move it. In Maya you can do this my hitting ‘Alt’ + ‘D’ on your keyboard. Open the “Outliner” window. This will make it simple to select each model.

Step 9
Now with both windows open, add one couch model to “Target Mesh”, and the other one to “Source Mesh”. They are the same so, it does not matter which one goes where.

Step 10
Moving down the transfer map window, choose “Shaded” as your “Map Type”. You can save it out in whatever format you want. In this case I used jpeg, and made the size 1024 x 1024 (to match my diffuse map). Now, hit “Bake”.

Step 11
Jump to Photoshop, and open your file that you just saved. When you open it, you should get a map that looks something like in the picture. The red is where the light was hitting the model. This also happens to be where most of the dust on an object is.

Step 12
Open your diffuse texture, and shift drag the dirt map onto it.

Step 13
Make sure the dirt map is top layer.

Step 14
Now go to “Select > Color Range” and choose red. You will see all of the red parts in the light preview. This is why we made the light red. The truth is you could render it out at any colour, but this way it is easiest to select. Now hit “Ok”.

Step 15
All the red should now be selected. It may look like not everything is selected, but don’t worry, for some reason Photoshop does not preview it all.

Step 16
With it still selected, make a new layer above your selection and choose a bright colour with the color picker. In this case I used lime green. Fill the selection, with the bright colour. This makes it easier if you want to have more then one dirt layer (sometimes I have more than 100!).

Step 17
Now you can ether delete or just turn off the red and black map, because you don’t need it anymore. I always file it away in the PSD though just in case.

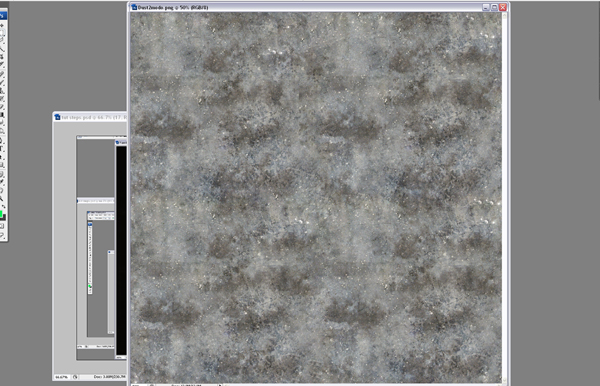
Step 18
With the brightly coloured dirt map now created, we will need a dirt texture to use. You can use just about anything, but it really depends on the look your going for, and what kind of surface your creating. The map in the picture is a pre-made dust texture created from some concrete photos.
Step 19
Drag the dust/dirt texture into your diffuse Psd file, place it above the selection map in the layers palette, and scale it until you’re happy with the level of detail. Now, hold down “Alt”, and hover the mouse pointer between the selection map layer and the dirt texture layer, and a little icon will appear. When it does, click the left mouse button. You have now assigned your texture to the selection map.

Step 20
Now play around with the blending mode and opacity of the selection map until you get the desired effect. I tend to keep it pretty low, but then again, it depends on the subject matter. Don’t change the blending mode or opacity of the texture, or the green selection map will start showing through. If you’re doing a specular map, you can usually use the same dirt layers and just tweak them to be a little darker. You can also use this same process on your AO map to add some dirt to the crevices.

Step 21
End of tutorial! I hope you enjoyed yourself, or at least learned something new!!

'중요' 카테고리의 다른 글
| 데이터 교환포맷으로서 OBJ, Collada 와 Alembic 의 비교. (0) | 2013.06.22 |
|---|---|
| Alembic in maya2013(maya to Houdini) (0) | 2013.06.22 |
| Plug in - UV Layout 설치법 (0) | 2013.06.14 |
| OpenVDB (0) | 2013.03.15 |
| Houdini Tornado (0) | 2013.03.04 |